Gaydar Website
Memberships & Payments
We’re very pleased you’re considering upgrading your membership!
To upgrade to a VIP membership today sign in to Gaydar and follow the instructions below:
GAYDAR RESPONSIVE SITE
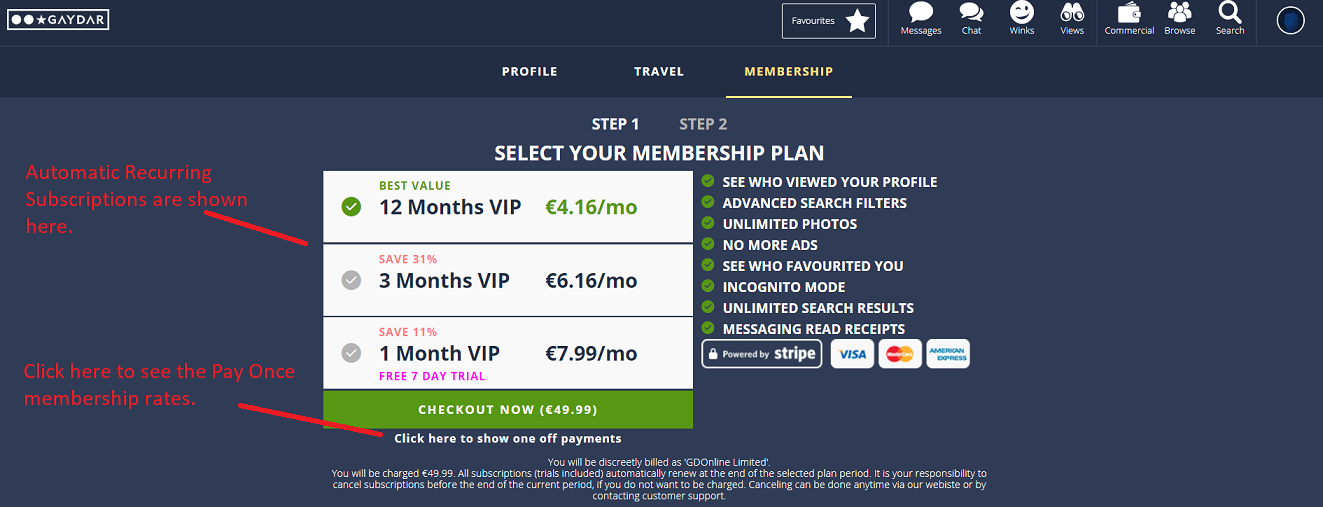
Tap/Click on the round thumbnail of your main photo on the far righthand side of the menu bar > select MY PROFILE > MEMBERSHIP > tap/click PAY ONCE for single payments or PAY MONTHLY for automatic renewal subscriptions
COUPON CODES
Coupon Codes can ONLY be used for AUTOMATIC RENEWAL subscriptions - they are NOT available for Pay Once options.
Once you are directed the Payment Page, if you have been given a Coupon Code, click on "Apply Coupon Code" that appears under your chosen membership plan, then enter the code that you were given in to the box, next click "Apply".
The discounted price will then be shown for the validity of the code.
Coupon Codes can ONLY be applied via the web site - not available through the Apps.
Coupon Codes cannot be linked to any other promotion or offer that may be running at the same time.
GAYDAR APPS
Tap/Click on the three line menu icon > select SETTINGS > MEMBERSHIP DETAILS > Explore VIP Membership
Coupon Codes can ONLY be applied via the web site - not available through the Apps.
Please note that all memberships purchased through the App Stores will automatically renew.
For information on cancelling your membership via the Apps please read more here:
For Apple: http://support.apple.com/kb/ht4098
For Google: https://support.google.com/googleplay/answer/7018481?co=GENIE.Platform%3DAndroid&hl=en
There are a number of benefit available through the VIP Membership:
- Unlimited Profile Views
- See who has been checking you out
- Completely Ad free experience
- Powerful filtering and search tools - Power Search
- More Public and Private photos on your profile
- Access to "Adult" images
- "Incognito mode" to browse undetected
- Look at your Favourites and Tracks
- Read Receipts - has your Sent message been Read?
ALWAYS ONLINE
One of the real benefits of your Commercial membership is once you have signed in to the responsive site
your profile will always show as ONLINE for added visibility!
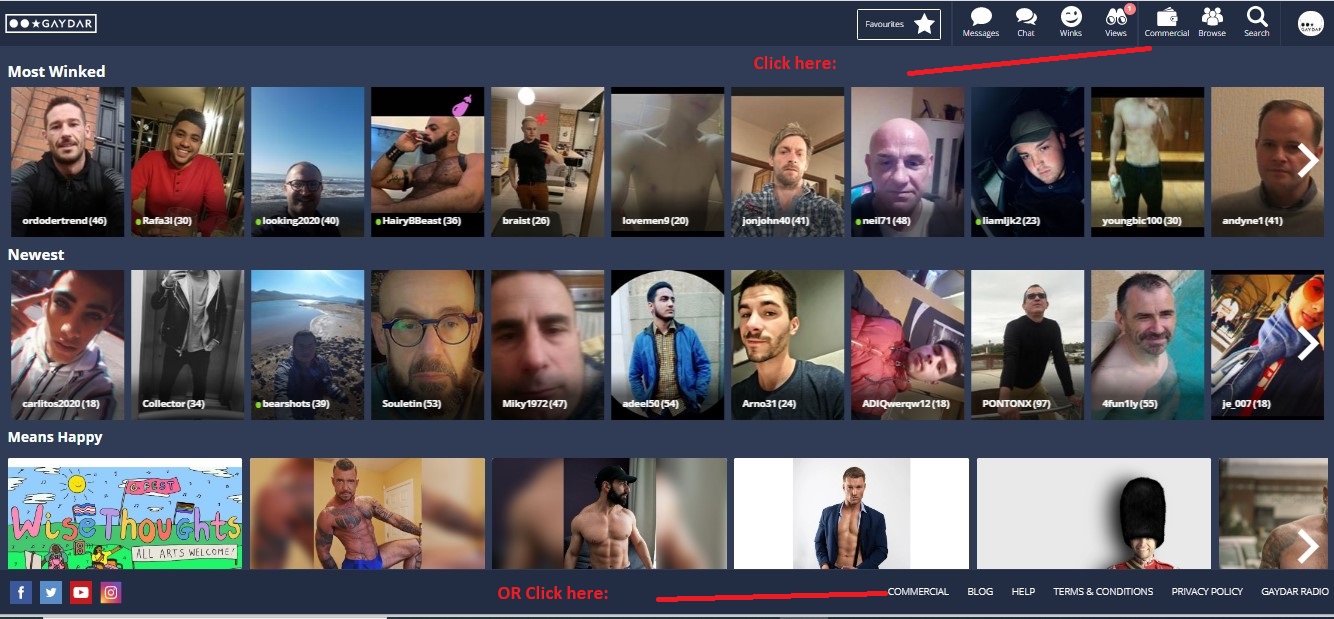
COMMERCIAL FILTER
Your profile can easily be found with the Commercial Filter
Tap/Click COMMERCIAL on the bottom toolbar
Search by Distance to find Commercial members nearest to you

Or tap/click on the arrow to search by Last active or New guys
Use Filtering to search by when profiles were created and by age.
Use the Edit button to the right of the Location Pin to search in a different location.
COMMERCIAL CHAT ROOMS
There are designated Commercial chat rooms for all major cities and areas,
in which you can promote your services to other Gaydar members and attract extra attention to your profile.
RESTRICTIONS and the APPS
Commercial membership payments cannot be accessed through the Android or iPhone app. You can ONLY purchase Commercial membership via the website.
As a Commercial member you can now access your profile via the iOS or Android Apps whilst you are "On the go". This means that you can read and reply to messages directly.
CODE OF CONDUCT
As a Commercial member please do not:
Solicit in non-Commercial chat rooms
Send unsolicited messages to Gaydar Members
Mislead customers with false information
Misrepresent yourself with misleading photographs
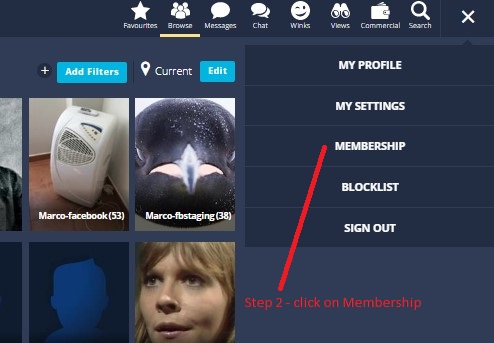
CANCELLING A SUBSCRIPTION ON THE RESPONSIVE SITE
Subscriptions purchased on the responsive site can be cancelled by signing in to https://www.gaydar.net/login
Tap/Click the round thumbnail at the far right of the main menu toolbar

Go to MEMBERSHIP
Your Profile Name will be shown to the right of "Billed to"
Now you can EITHER Contact Support for more assistance OR, Cancel Gaydar VIP.

To CONFIRM the cancellation, enter your Password and then click PROCEED
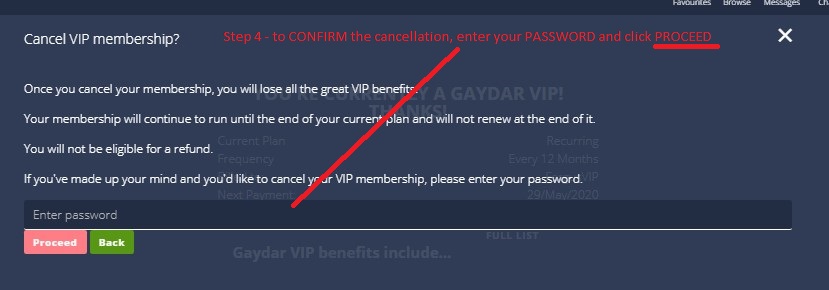
Your automatic renewal has now been cancelled and no further repeat payments will be taken.
Your subscription will stop at the end of the current billing cycle.
CANCELLING A SUBSCRIPTION ON AN iOS DEVICE
Subscriptions for the Gaydar iOS app purchased through the App Store need to be cancelled on your iOS device.
1. On the Home screen of your device, tap Settings.
2. Tap App Store.
3. Tap your Apple ID.
4. Tap View Apple ID. You might need to sign in.
5. Under Subscriptions, tap Manage.
6. Tap the Gaydar subscription that you want to manage.
7. Turn off Automatic Renewal to cancel your subscription
Your subscription will stop at the end of the current billing cycle.
Tap/Click on the link below for more information:
https://support.apple.com/en-gb/HT202039
CANCELLING A SUBSCRIPTION ON ANDROID
Subcriptions for the Gaydar Android app purchased through the Google Play Store need to be cancelled on your Android device.
- Open the Google Play Store
on your Android smartphone or tablet.
- Tap Menu
Account
- Find the subscription you want to cancel.
- Tap Cancel.
Your subscription will stop at the end of the current billing cycle.
Tap/Click on the link below for more information:
https://support.google.com/googleplay/answer/7018481?co=GENIE.Platform%3DAndroid&hl=en
Photo Guidelines
Did you know on Gaydar that profiles with headshots as the main photo get the most views?
Research shows that profiles with clear headshots get the most attention. That's why we recommend to our members that their Main Photo is a headshot (face/shoulders/torso). Don't be afraid to make your face the star of the show. After all, it's what we all see and talk to!
Profiles without a main profile picture may not be seen on the main search grids.
ADULT PHOTOS:
Users can post pictures of an adult nature on the public gallery but these pictures will be moderated as “adult” and can only be seen when a VIP user requests access. By default, all users will see these pictures as a blurred image. These pictures will include:
Pictures of your private parts
Erections
Bums
Pubic hair
Pictures of your manhood obscured
The following pictures would also be classified as adult:
Photos of frontal, back or side nudity.
Photos of sexual acts, either real or illustrated.
Photos of masturbation
Photos that show semen (or any fluid made to look like semen or ejaculation) on anything in photo.
Photos of enemas.
Photos of bondage and restraint.
It is assumed that a user has given permission for anyone to view any picture they have uploaded to the public gallery.
The pictures can also be sent as message attachments from your Private Gallery.
PRIVATE GALLERY:
Some pictures which are not of yourself will be classified as “private or adult” and can be sent in private messages. These include:
Photos of multiple people who are not the profile owner (pictures that are obviously couples (male) will be allowed as public pictures)
Photos of any non-Gaydar users, including celebrities and politicians (compromising as well non-compromising photos).
Photos which are text only
Photos containing nudity (particularly the genitals) covered up by a towel, hat or other means.
Photos of a person grabbing/holding or touching genitals or genital area.
Photos of visible pubic hair.
Photos with sheer, or otherwise see-through or wet material below the waist.
Photos showing outline of genitals through clothing.
Photos of clothed crotch or bum area only.
Photos that are deemed sexually explicit or overly suggestive.
Photos that show suggestive or overly sexual poses.
Photos altered to hide sexual acts including a black box or blurred filters to hide sexual images such as touching of genitals by hand.
Photos that contain sex props and toys such as dildos, butt plugs and urethral sounds, including the use of fruits/vegetables.
Photos of an adult wearing nappies.
BANNED IMAGES:
Now as you'd expect, we're very open minded here at Gaydar. But we do have limits. And so we must tell you what photos are NOT ALLOWED on our products
Photos of insertion of large objects likely to cause injury.
Photos of faeces, and or blood.
Photos of extreme body modification.
Photos of pegging, needles, clamps – attached items likely to cause lasting damage and bodily harm.
Photos of internal / extreme close-ups, including specu
Photos of Saline infusion.
Photos of asphyxiation, strangulation, stomping.
Photos of BDSM pain play that show raised welts, blood and bruising.
Photos of bondage with no apparent means of withdrawing consent.
Photos of realistic portrayals of rape.
Photos containing child pornography or anything which might ‘encourage’ incest or sex with children under the age of eighteen.
Photos of one or more persons involved in a sex act with an animal.
Copyrighted photos, or photos of copyrighted artwork, cartoons or illustrations.
Photos of any non-Gaydar users, including celebrities and politicians (compromising as well non-compromising photos).
Blank photos of colours, textures, extreme close ups or unidentifiable objects.
Photos of anyone under 18 years of age or is portrayed as being under 18 years of age (also in the background).
Photos displaying violent acts to a member himself (self-mutilation), someone else, or animals.
Photos of illegal drug use and paraphernalia.
Photos of firearms or weapons.
Photos used to advertise services, goods, websites, or events.
Photos of political or religious cartoons.
Photos deemed to be overtly suggestive, racist, bigoted, or that might offend our community.
NOTES:
Thousands of photos are uploaded to Gaydar every day. Every single photo will be reviewed, approved and classified by our moderation team, within a few hours, in the order in which they are received. Our moderators are only human and occasionally make a mistake. If you see any photos on Gaydar that have been wrongly rated or should not have been approved then please report them to us through the Report Profile function. Thanks in advance for helping us. We really appreciate it!
We reserve the right to remove or crop any photo we perceive to be outside of the following guidelines, at our discretion.
Please note: Any violation of our photo guidelines could result in the suspension of your account or a permanent ban from Gaydar.
When you create your profile we always suggest that you add a "face pic" so that other members can see who you are!
That first image is created as your Main Image.
Additional photos can be added to your profile as follows:
Guest members:
Guests can add an additional 5 images to the Public Gallery, and a further 5 images to their Private Gallery.
If you try to add more images that exceed the limit, you will receive the response:
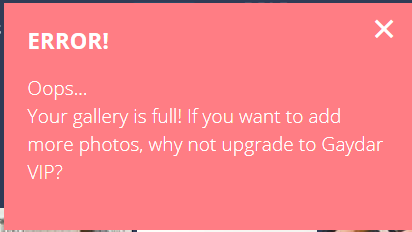
VIP members:
VIPs can add up to 50 images to the Public Gallery, and up to 100 images to the Private Gallery.
There are various icons used to identify certain characteristics of an image.
Favourite: you have added this person to your list of favourites:
![]()
Commercial: this is a Commercial Profile.
![]()
Travel: this profile has created a Travel Plan.
![]()
Adult: this image is classified as Adult content, only visible to VIP members, on request. Click the image to request access.
Guest members will be directed to the Upgrade pages. https://www.gaydar.net/membership
![]()

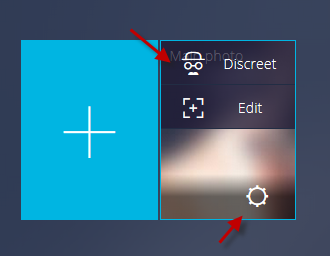
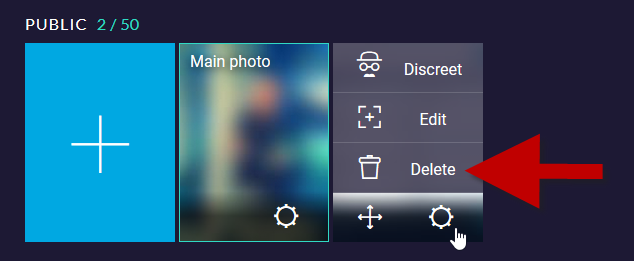
DELETING YOUR CURRENT MAIN PHOTO
To be able to delete your current Main photo you need to move another non-explicit photo from your public or private gallery over to MAIN PHOTO first.
MOVING ANOTHER ONE OF YOUR PHOTOS TO MAIN PHOTO
Tap/click on your round thumbnail at the right of the main menu toolbar > select MY PROFILE > tap/click on EDIT next to PUBLIC GALLERY.
To move your image, tap/click the move icon on the thumbnail of the image in your gallery and select Set Main
Your previous main image will now have moved second in line and when you tap/click on the Cogwheel icon you can now delete it.
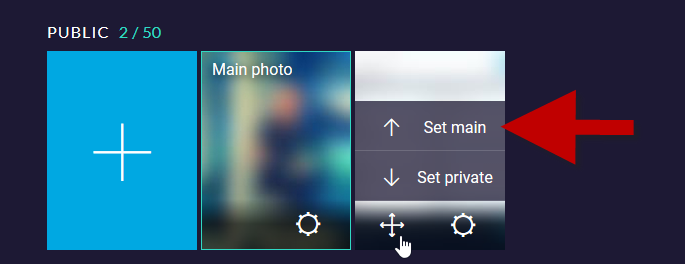
UPLOADING A NEW MAIN IMAGE TO REPLACE THE CURRENT ONE
To be able to upload a new Main photo to replace your current one, you need to upload upload it as Public or Private FIRST.
Once uploaded, move your image by tapping/clicking the move icon on the thumbnail of the image in your gallery and select Set Main
Make sure any images you upload meet our requirements.
If you are uploading an image and it tells you the image is too small try selecting a larger area with the cropping tool.
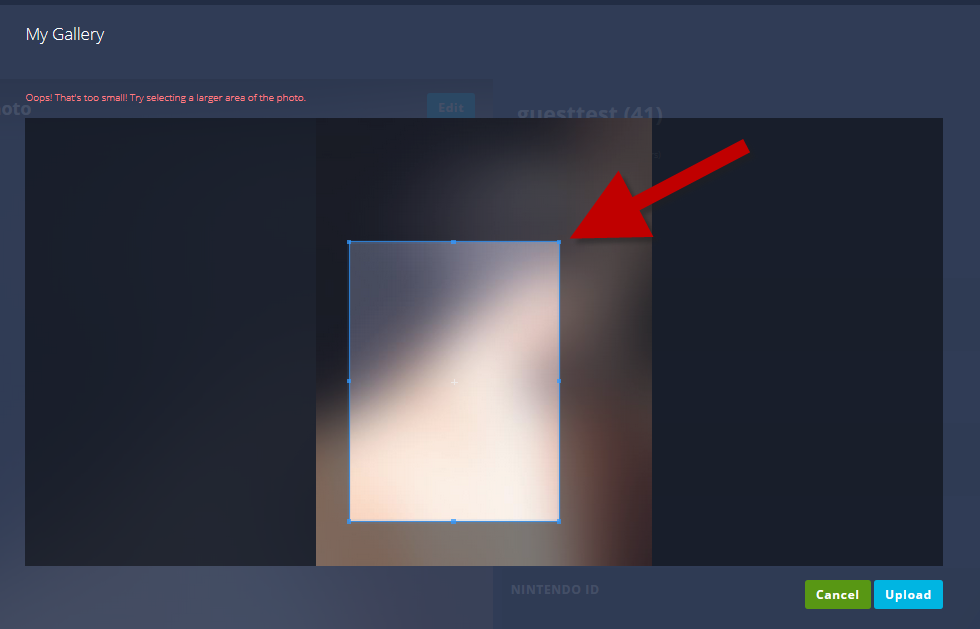
Drag one one the corners outwards.
Our minimum size restriction for photos is 375 x 500 pixels. The ratio being 1 x 1:33 (horizontal x vertical). This means that "square" images cannot be uploaded.
There is no maximum size restriction.
Below are a few easy steps to check the size of your image:
Using a PC?
- Right click on the image and then click on ‘properties’ (if using a PC)
- Under ‘Details’, look at the ‘Dimensions’
Using a Mac?
- Right click on the image and then click on ‘Get Info’
- Look at the ‘Dimensions’
You should be able to upload any images that are 375 x 500 pixels or larger without any problems. Please check you have the correct ratio as shown above.
If your photo is smaller in size you could try resizing it before you upload it.
Below you can find a help page for resizing images:
Profile Extras
VIP members signed in to the responsive site have access to the POWER SEARCH tool.
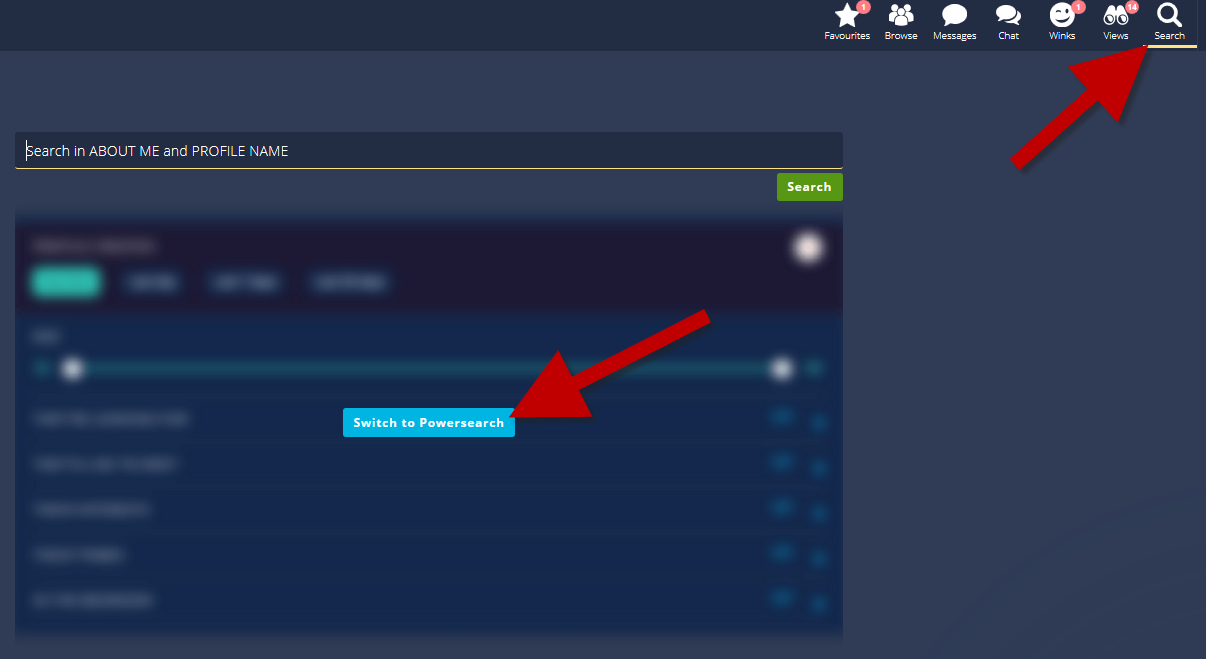
Select SEARCH > Switch to Powersearch
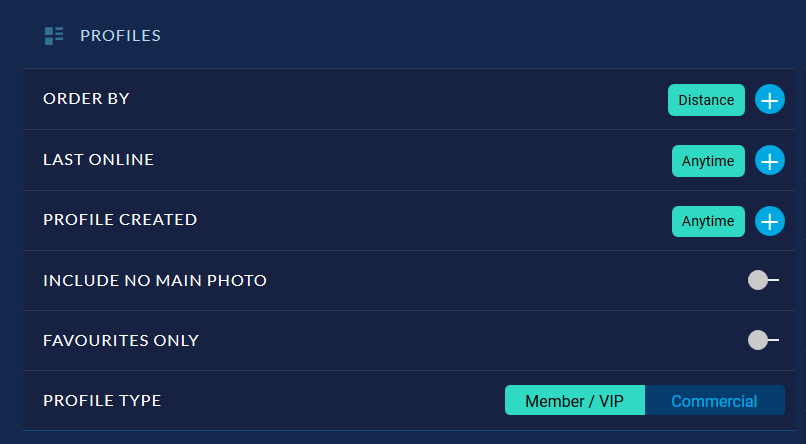
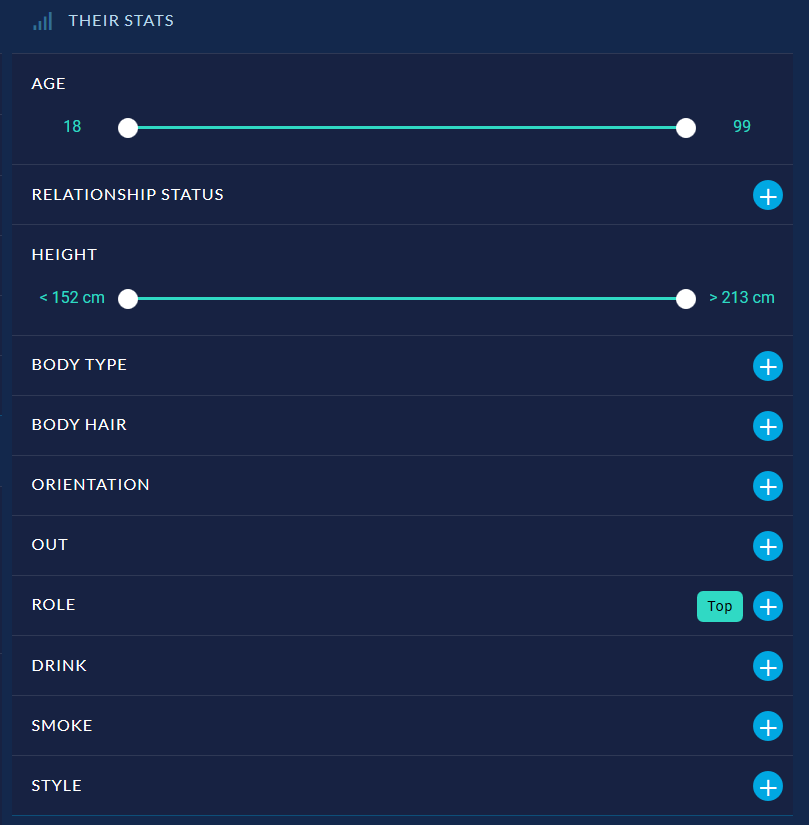
Tap/Click on the the blue PLUS buttons to open the submenus, switch on or off, or use the slider bar.
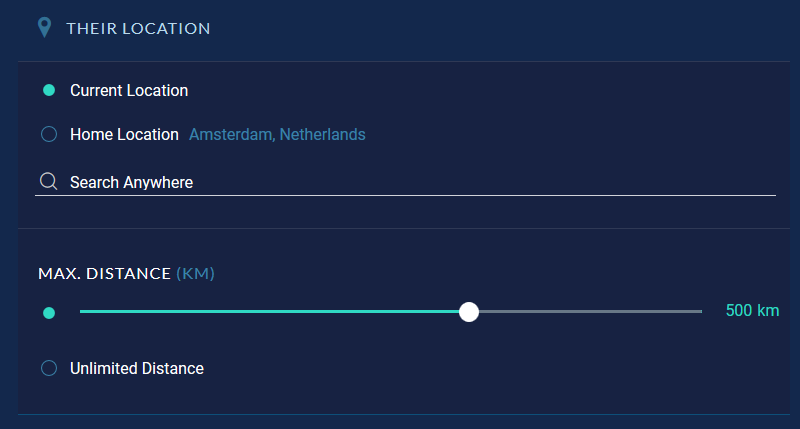
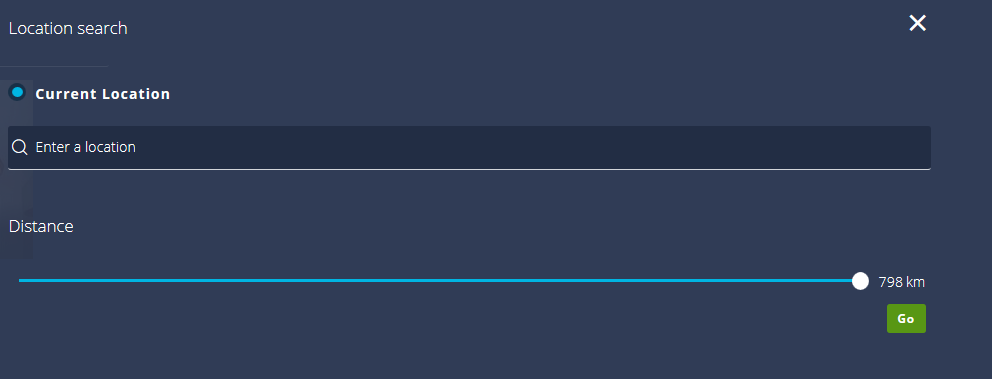
Under THEIR LOCATION you can set the location you wish to search in and the radius.
THEIR STATS lets you search for a specific age range, body stats, orientation, role etc.
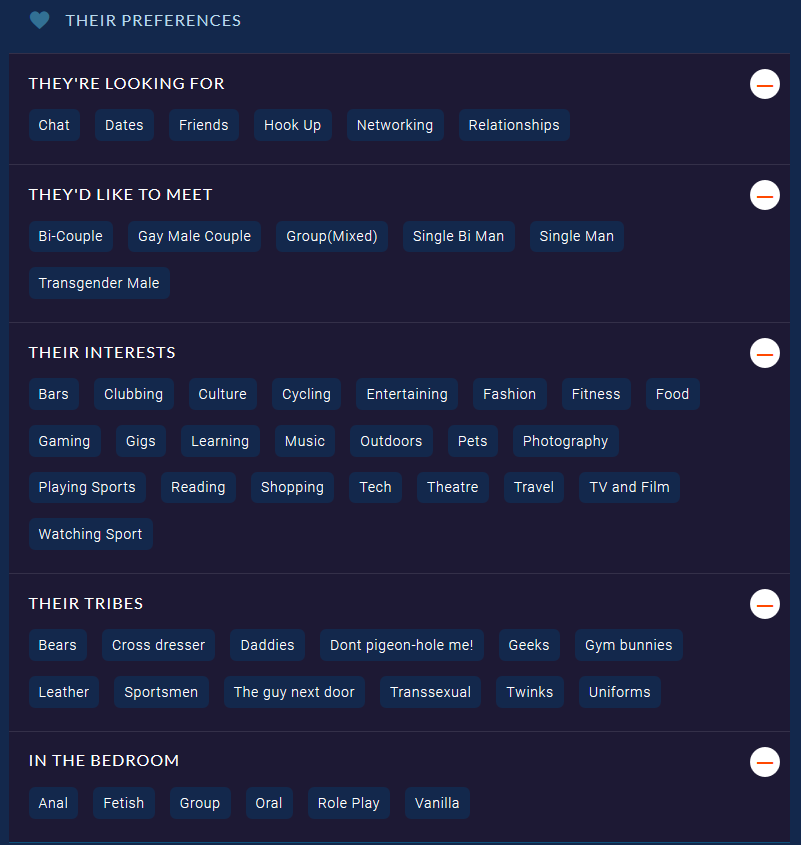
For a really detailed search narrow down by selecting THEIR PREFERENCES.
To activate your POWER SEARCH tap/click on Go which will bring up a grid of profiles that matches your criteria.

In case you would like to adjust your POWER SEARCH tap/click on Clear
Tap/Click on the photo icon of your main photo on the far righthand side of the menu bar > go to MY PROFILE > select TRAVEL
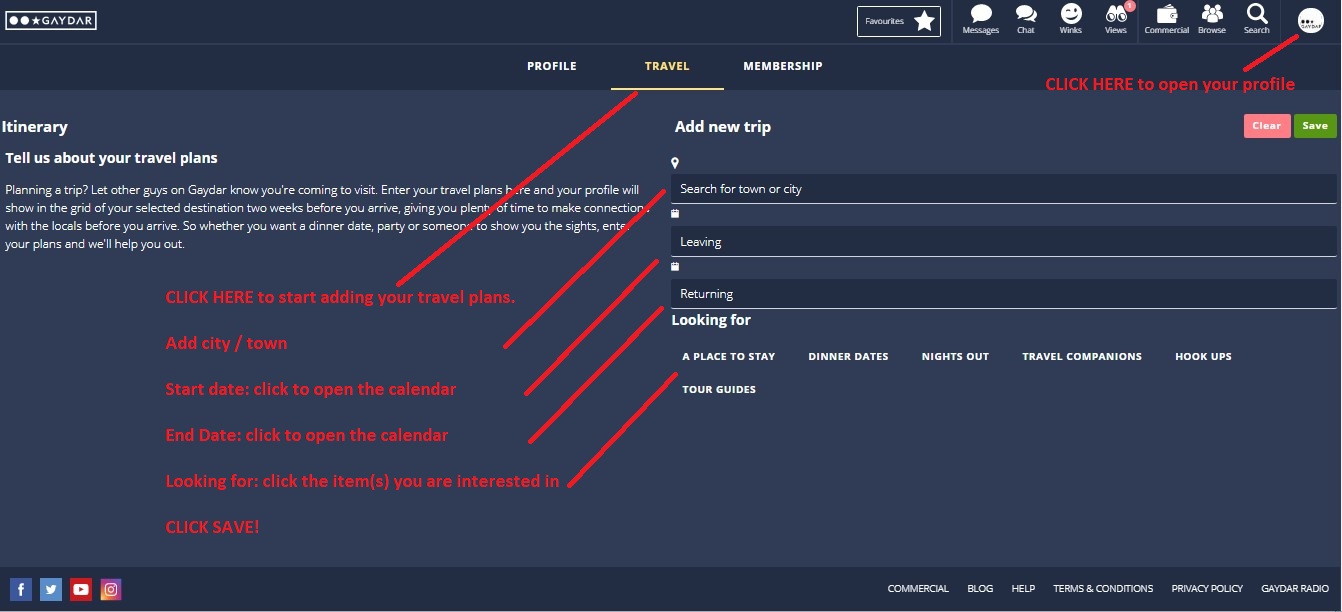
Start typing your destination in Search for destination and select it from the dropdown menu results
Enter Leave and Return date
Select what you are looking for and tap/click on Save
Your profile will now appear in the profile list of your travel destination two weeks before you travel.
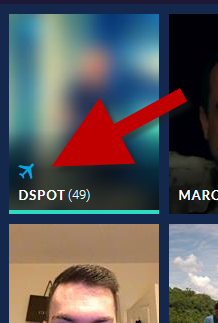
An airplane icon will appear on the thumbnail of your profile in the the profile grid.
To view someone's travel itinerary open the TRAVEL PLANS section on their profile.
How to change your Travel Plans
Tap/Click on the profile icon image > select TRAVEL > tap/click on EDIT under ITINERARY > adjust destination or dates > SAVE
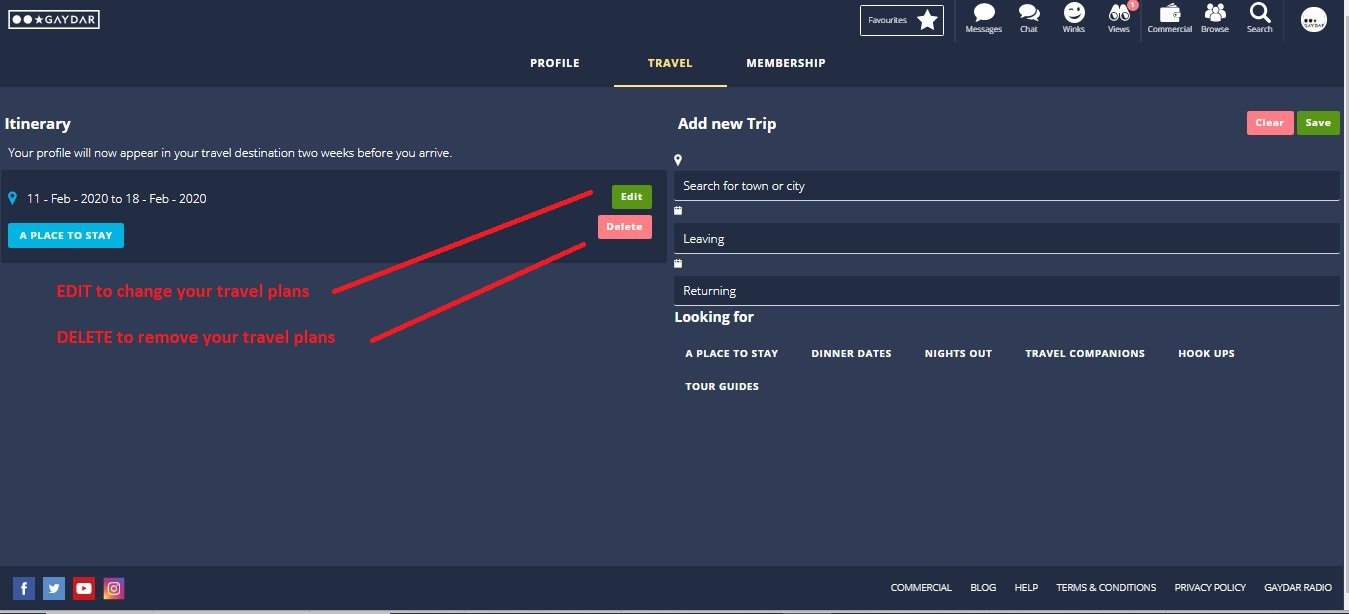
How to delete your Travel Plans
Select TRAVEL > under ITINERARY > tap/click on DELETE
To open the Commercial section scroll to either the TOP or the BOTTOM of the page and tap/click on COMMERCIAL
If you are looking for Commercial profiles in your area make sure you set it to Order by: Distance.
This will show profiles nearest to your current location.
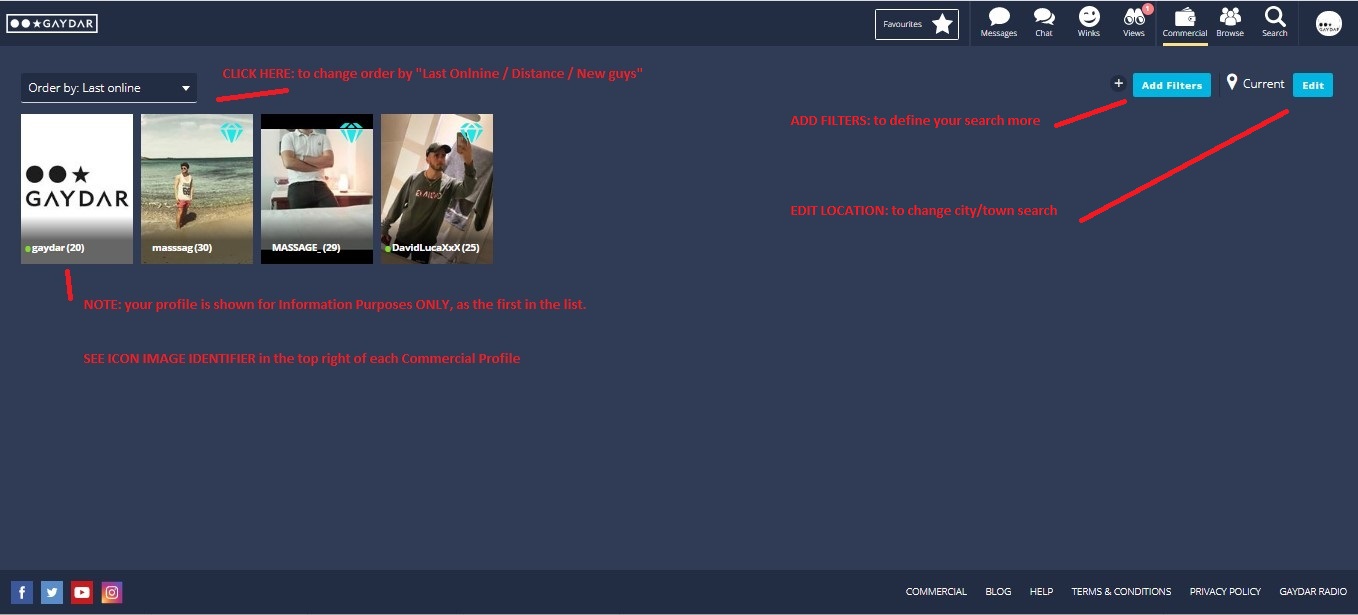
To search for Commercial profiles in other areas tap/click on Edit to the right of the Current Location pin.

Enter a location > set a distance > GO
Additionally you can filter by when profiles were created and age.

Tap/Click on Edit to the right of Filtering
Select Any time, Last day. Last 7 days, Last 30 days > Set age > tap/click on Filter
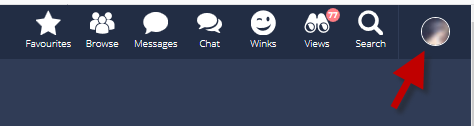
To ask for a Password and Profile Name reminder go to the main Log In page.

Click on the "Can´t access?" icon shown in yellow.
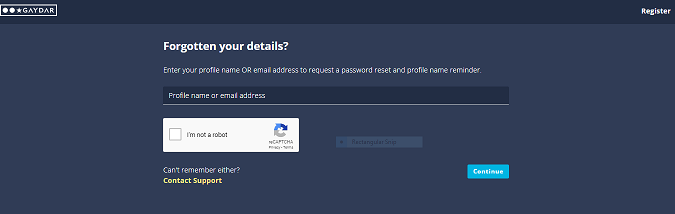
Enter your REGISTERED Profile Name or Email Address as requested.
Then click on the "I´m not a robot" icon and follow the onscreen instructions, and then click Continue.
If you are still unable to access, please contact Support.
After requesting a Profile Name or Password reminder, if you are still not able to access your profile, it may be that it was deleted.
This can happen if you deleted the profile yourself, or due to inactivity.
The profile may need to be reinstated by Customer Support, or that you may need to create a new profile.
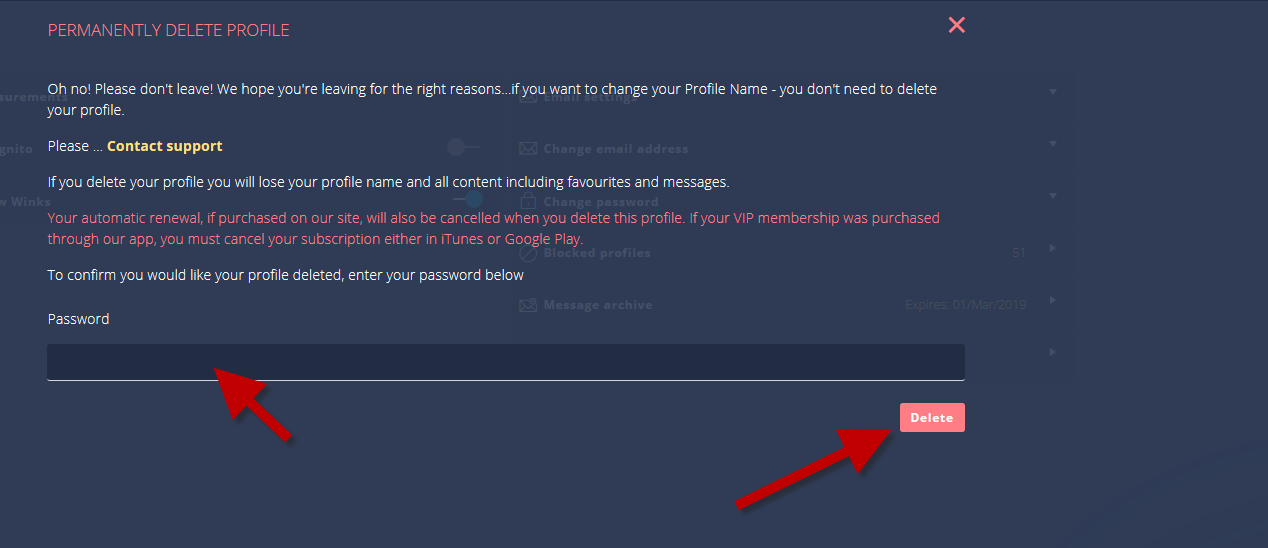
NOTE: By deleting your profile this DOES NOT cancel any VIP membership plan that you may have.
Go to the Memberships & Payments FAQ page to see how to cancel any subscription BEFORE you delete your profile.
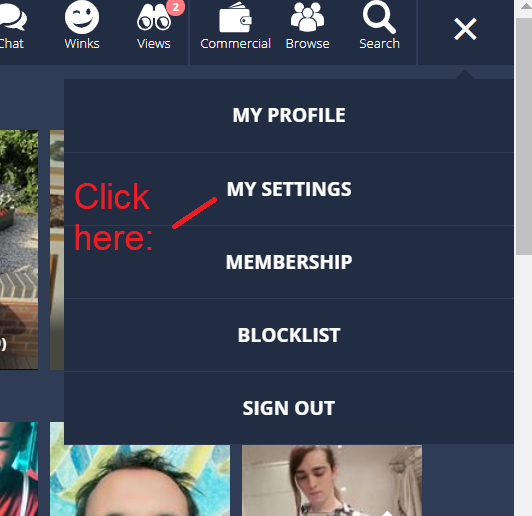
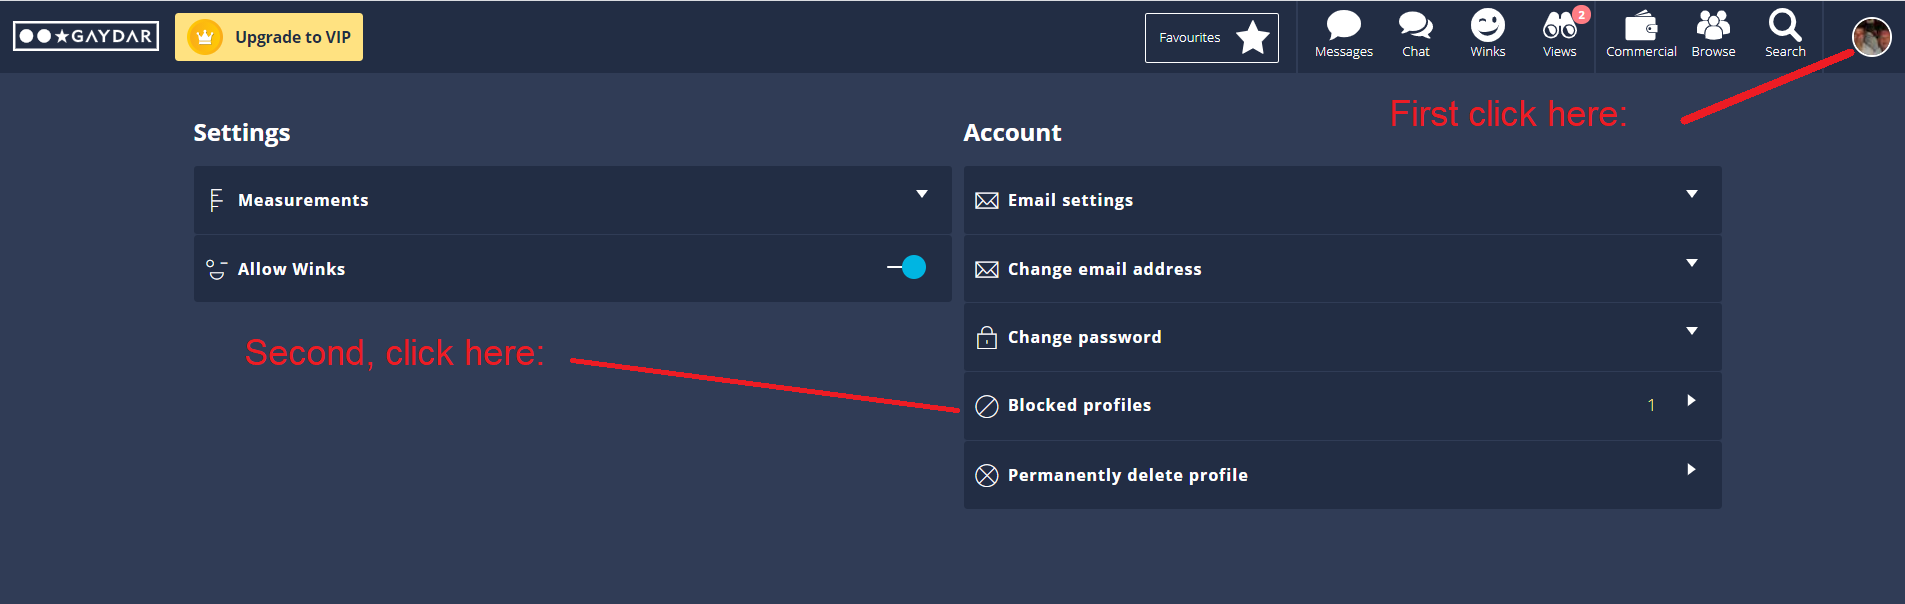
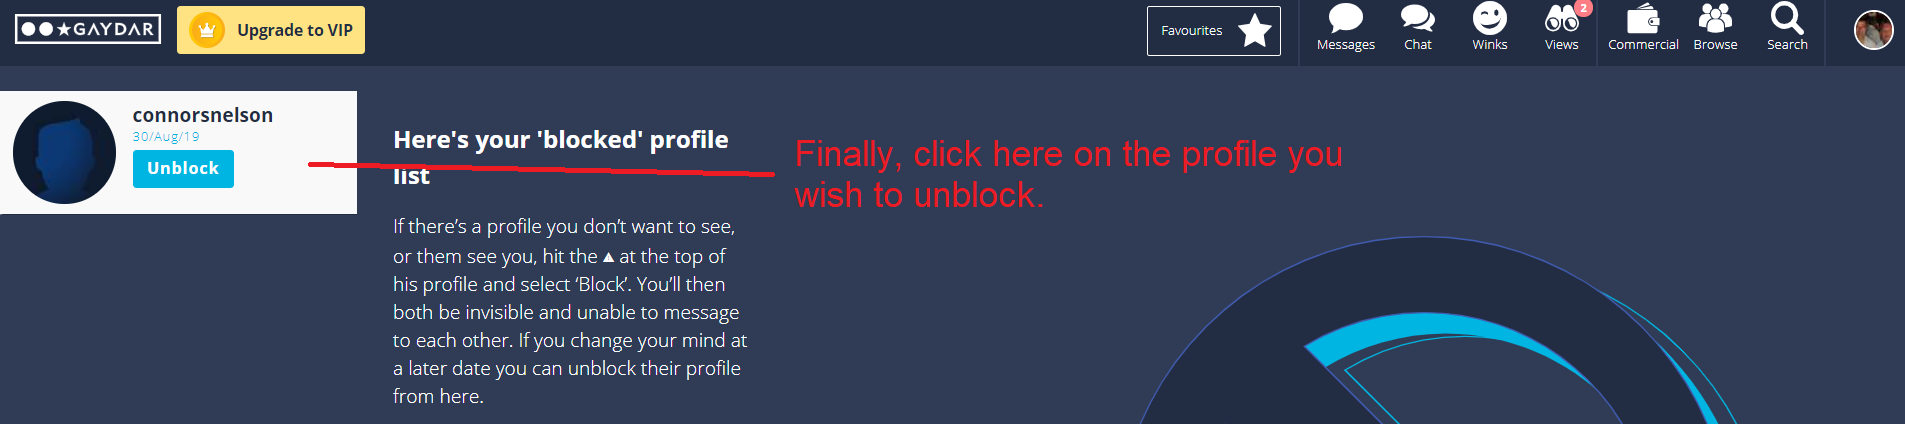
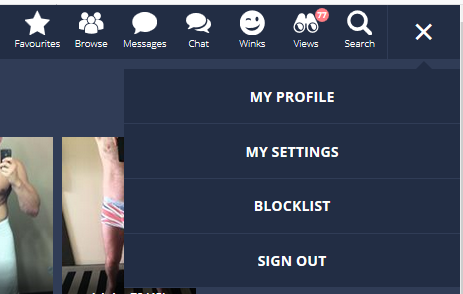
Open you profile by clicking the icon image
Click on My Settings
Open the Permanently delete profile section

Enter your password and press the Delete button
Location
Here's a few steps you can take to make sure your location is shared with Gaydar.
While we strive to keep these instructions as up to date as possible, browsers are always updating their software and some steps may change. If you are using older versions of the operating systems and browsers you may need to seach for specific instructions for these older versions. On some older versions sharing locations may not be possible.
Sharing your location on Gaydar is key to get the best possible experience out of it. Firstly, check your computers own location settings, then check your internet browser settings:
![]() Windows PCs:
Windows PCs:
On your PC, please go to your Settings page (type settings into the search in the bottom left of the screen and usually this will be the top result), then click on Privacy, and next click on Location which is under the App Permissions title. At the top of the screen you will see Location Service which should be set to ON. (You can click in the blue bar to turn it OFF or ON). Under that is Default Location: click on that and the PC can use a default setting for you if it is not able to detect a more precise location. You will be presented with a map that you can set. Next, scroll further down your screen to "Choose apps that can use your precise location". In that list, if you see the browser that you use listed, please ensure that also is set to ON.
![]() MAC OS:
MAC OS:
On your MAC (version OS X Mountain Lion or later), choose System Preferences from the Apple () menu, click the Security & Privacy icon, then select the Privacy tab. If the padlock icon in the lower left is locked, click it and enter an admin name and password to unlock it. Select Location Services from the list on the left, then check the "Enable Location Services" checkbox. Apps that you have allowed to use Location Services appear in the Privacy pane of Security & Privacy preferences. Checkboxes show whether Location Services is turned on or off for an app. Please make sure your chosen browser is checked to enable Location Services. Next, check your internet browser settings:
![]() Google Chrome
Google Chrome
On your computer:
- Open Chrome.
- At the top right, click More ⋮ > Settings.
- Under "Privacy and security”, click site settings.
- Click Location (under permission).
- Make sure "Sites can ask for your location" is on.
- Make sure Gaydar isn’t in the Not allowed to see your location list.
- You may need to clear your cache on your browser and refresh the page for setting to take effect.
If you’re not using a computer, here is how to give Chrome access to your location on Android and on iOS devices.
![]() Apple Safari
Apple Safari
On your Mac Computer:
- Select System Preferences from the Apple () menu.
- Click the Security & Privacy icon in the System Preferences window.
- Click the Privacy tab.
- Select Location Services.
- Ensure "Enable Location Services" and “Safari” checkboxes are ticked.
- If, not, click the padlock icon in the lower left and enter an admin name and password to unlock it.
- Tick both checkboxes.
- Open Safari
- Select Safari > Preferences.
- Click the 'Websites' icon on the top bar in the Preferences window.
- Select Location in the left hand side pane.
- Make sure that Gaydar.net is set to 'Allow' or 'Ask'.
If you’re using a web browser on an iPhone or iPad, here is how to give it access to your location. If you're using an older version of macOS or Safari, check out this article from Apple Support for extra help.
![]() Microsoft Edge
Microsoft Edge
To set your Location using Edge as your browser:
- On your PC, go to Settings / Location. Scroll down the page part way and ensure that "Allow Apps...." is set to ON Scroll further down the page to "Choose which Apps..." and ensure that is also ON.
- Open your Edge browser and got to the website address www.gaydar.net (Do NOT sign in to your profile just yet) In the URL bar (where you type the website address) you will see a "Padlock" symbol. Click on the padlock and select permissions for this site and ensure that Location PERMISSIONS are set to ON.
On your Windows 10 Mobile:
- Go to Settings.
- Select Privacy > Location.
- Turn Show location icon on or off.
If you’re not using a computer nor a Windows Mobile, here is how to give Edge access to your location on Android and on iOS devices.
![]() Mozilla Firefox
Mozilla Firefox
On Windows
- Open Mozilla Firefox
- Open the website that you wish to enable the Location service for: www.gaydar.net
- Click the menu icon, top right of your screen, shown as 3 horizontal bars.
- Go to the Options (cog wheel) half way down the screen.
- Click on Privacy & Security - then scroll down to Permissions
- Click on Location and the box "Settings"
- Any website that asks for your location will be in the list.
- In the box to the right, click Allow and then Save Changes.
On Mac
- Open Mozilla Firefox
- Open the website that you wish to enable the Location service for: www.gaydar.net
- Click the menu icon, top right of your screen, shown as 3 horizontal bars.
- Go to the Settings half way down the screen.
- Click on Privacy & Security - then scroll down to Permissions
- Click on Location and the box "Settings"
- Any website that asks for your location will be in the list.
- In the box to the right, click Allow and then Save Changes.
If you’re not using a computer, here is how to give Firefox access to your location on Android and on iOS devices.
If you're finding it difficult, feel free to contact our support team for additional help.